
I usually try to have a common theme every week, whether it’s an ingredient or type of cuisine. I do the same with my Thanksgiving posts, even when they span multiple weeks. Well, I’m trying something a little different this year. I’m not focusing on a theme and instead, I’m creating a full Thanksgiving menu, complete with a schedule and equipment list. I know it’s not a new idea for a blog post, but it’s a new style for me. And I’m hoping it will be my most well-planned Thanksgiving dinner yet. Let’s get started with this amazing sounding Maple Cider Bourbon Brined Turkey with Bourbon Gravy!
Maple Cider Bourbon Brined Turkey with Bourbon Gravy has crispy skin, juicy meat, and so so much flavor!
The Menu
The turkey is going to be my centerpiece (of course!) and I’ve found a recipe that sounds like the turkey to end all turkeys. This Maple Cider Bourbon Brined Turkey with Bourbon Gravy recipe is chock full of Autumn goodness. Apple cider, maple syrup, cinnamon, and orange are just a few of the flavors I’ll be using to brine a turkey for the first time ever. I’m so excited about this part!
But what about all the rest? I’ve got that covered! There will be a few new recipes and a couple I’ve done before. The goal is a delicious dinner but that doesn’t mean it needs to be difficult. I’m going to incorporate a dish that can be made ahead of time, a couple that can be made in 30 minutes or less, and one I can throw into my slow cooker and forget for a few hours. Oh, and I made sure only the turkey uses the oven, so there’s no traffic jam there.
- Maple Cider Bourbon Brined Turkey with Bourbon Gravy
- Make-Ahead Mashed Potatoes
- Slow Cooker Thanksgiving Stuffing
- Green Beans with Tarragon
- Grand Marnier Cranberry Sauce
- Pumpkin Pie Cupcakes
I didn’t include a cocktail, but I’m thinking this Hot Apple Pie Bourbon Cocktail might make an appearance. It would be a nice way to finish dinner, especially for those who want to skip dessert. I’ll use a ready-made butterscotch sauce to make it quicker and more convenient, of course. Otherwise, it’s worth a little extra work!
The Schedule
Planning is key to a big dinner like this. I am going to do as much as possible in the days before so the day-of isn’t too hectic. Here’s the plan:
Six Days Before
- Finalize grocery list
- Clean out the refrigerator
- Supply check — make sure I have everything I need or borrow it
Five Days Before
- Grocery shopping
- Begin thawing the turkey (24 hours per 4-5 pounds)
Two Days Before
- Make the turkey brine (est. 10-15 minutes)
- Make the mashed potatoes (est. 1 hour)
The Day Before
- Add bourbon, water, and brine mix to brine bag & brine the turkey
- Empty the oven’s warmer drawer (I store dishes in it)
- Make the cranberry sauce (est. 25 minutes, stovetop)
- Make the Pumpkin Pie Cupcakes (est. 90 minutes, oven)
The Day Of
- Roast the turkey (est. 4-5 hours, oven)
- Make the stuffing (est. 4-5 hours, slow cooker)
- Remove cranberry sauce from the refrigerator (est. 2 hours)
- Reheat the mashed potatoes (est. 15 minutes, microwave)
- Make the green beans (est. 15 minutes, stovetop)
- Stir up the gravy (est. 20 minutes, stovetop)
- Remove the cupcakes from the refrigerator
I always like to make things ahead of time when possible. The day-of order starts with the items that take the longest to prepare and also keeps in mind which dishes are easiest to keep warm while the others finish.
2020 Thanksgiving menu with schedule, grocery list, and equipment list
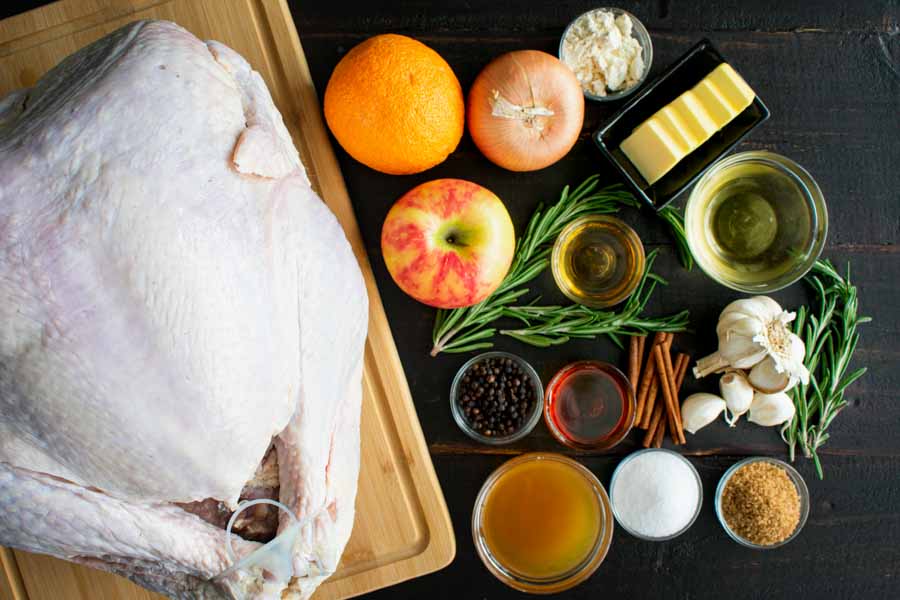
The Ingredients
All right! At last, we get to the turkey. This recipe calls for a 15-pound bird. On a budget like me? Go with frozen since it’s cheaper. Just be sure to allow plenty of time for it to thaw (24 hours per 4-5 pounds of turkey).
I ended up with a 20-pound bird because that was as close to 15 pounds as the store had. That means extra time to thaw and cook, but more turkey is never a bad thing. The turkey was $1.49 a pound and came out to just over $30.
The rest of the ingredients were pretty basic, and it was easy to find what I didn’t already have. I had to stock up on the fruit, rosemary, and some apple cider. Oh, and the bourbon. Can’t make Maple Cider Bourbon Brined Turkey with Bourbon Gravy without the bourbon (I went with Jim Beam)!
The Process
This recipe might sound like a lot, but it wasn’t that difficult since it was divided into three phases: the brine, roasting the turkey, and making the gravy. It came out spectacularly with surprising ease. Here’s how my time was spent:
- 17 minutes to make the brine
- 20 minutes to prep the brined turkey
- 3 hours 30 minutes to roast the turkey
- 21 minutes to make the gravy
- 4 hours 28 minutes total (not including time for brine to cool and 24 hours to brine)
Making the Brine
This was super easy, and I had the brine mixed up in 11 minutes. I just threw all the ingredients into a large saucepan and started them heating while I zested an orange. Then I added the zest and let it all simmer for five minutes.
My largest Snapware container was the perfect size to store the brine. I poured the warm mixture into it and let it sit on my countertop while I started the Make Ahead Mashed Potatoes. It was cool enough to cover and refrigerate before the potatoes were finished.
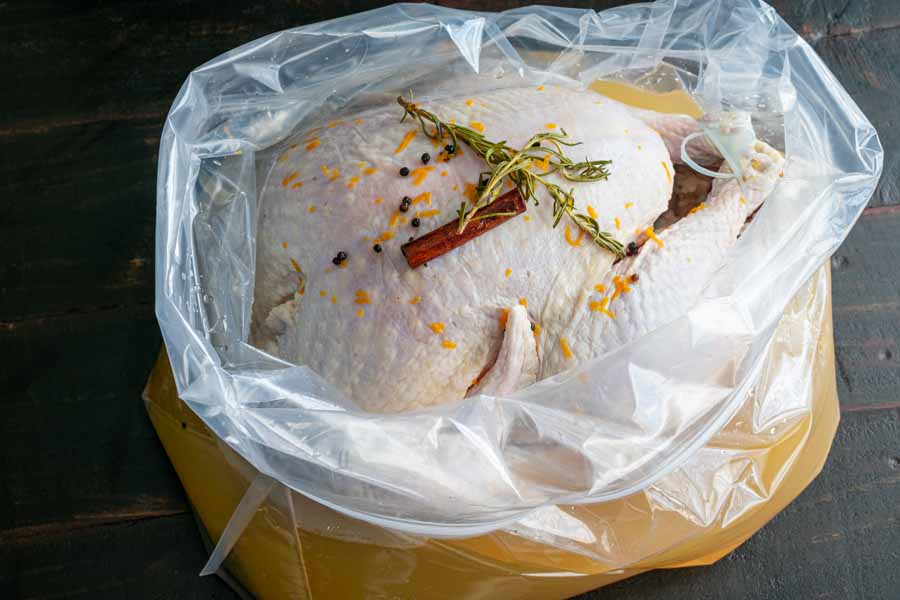
Brining the Turkey
The next day my turkey was thawed, my brining bags had arrived, and it was time to brine a turkey for the first time ever. I was kind of excited, but it wasn’t really an exciting process.
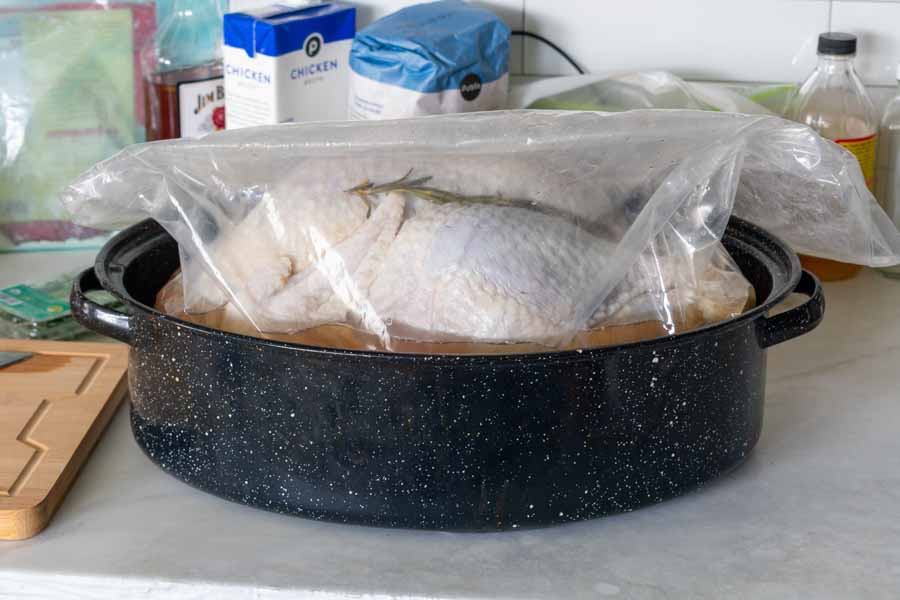
Seriously, place a giant turkey into a brining bag (essentially a giant ziplock bag) and pour in the brine, water, and bourbon. Push out as much air as possible, zip, and place it all into the refrigerator. That’s it, though I highly recommend putting the bag into a pan just in case there is a leak.
Then sit back and try to remember to turn the darn thing a few times before you go to bed. That sounds easy, but it was a little tough with a 20-pound turkey-zilla. To be honest, I brined it bottom-down until after dinner, then I flipped it onto the breast to brine that side overnight.
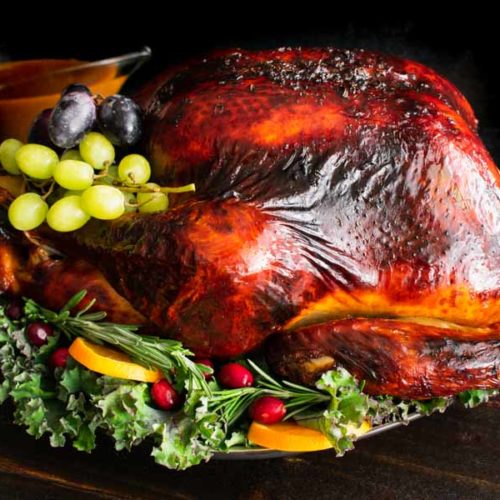
Roasting the Turkey
I have to say that this was the first Thanksgiving dinner I have ever made that can be described as easy. It was such a chill day that I almost took a nap. Almost.
I started out by taking the turkey out of the refrigerator, draining the brine, and patting it dry. Then I added everything to the cavity, which was so easy because nothing needed to be peeled!
After that, I moved on to the butter. I have to admit that I forgot to set it out to come up to room temperature, but I was able to soften it by resting the stick under a glass warmed with hot water.
I also used my hands to mix up the butter and herbs. Prepping a turkey is a hands-on process! It just took a few minutes to smooth the butter over the turkey, taking time to peel up the skin over the breast to get some of the mixture underneath.
Once the wings were tucked and the legs secured (my turkey had a plastic piece to hold them, otherwise use kitchen string) I placed the turkey onto a greased rack in my largest roasting pan and popped it into the oven.
I knew my turkey would need additional cooking time, so I went with 13 minutes per pound, for a total of 260 minutes (4 hours 20 minutes). I kept a meat thermometer in the thigh to make sure it got to the correct temperature, and I’m so glad I did that! My turkey cooked faster than expected, and my thermometer beeped when it was ready.
And, as you can see, the skin browned very well without basting once. In fact, I had to tent the turkey with aluminum foil around 90 minutes in to keep it from getting any darker.
Making the Gravy
This was the most labor-intensive part of the process, but it really wasn’t bad. I began by draining the pan drippings in my gravy separator. It removed all the extra browned bits and separated the excess fat. Super handy! but you could simply use a mesh strainer if you don’t have one.
Next up was mixing the flour and turkey stock (substituted for chicken broth). Putting them into a sealed container and shaking them was low-key genius! It mixed them up quickly with no lumps.
I had done all the other chopping and measuring while the turkey roasted, so the rest of the ingredients were ready to go right into the pan. All that was left was to stir it while it simmered for 15 minutes, then add salt and pepper to taste.
The Recipe
Maple Cider Bourbon Brined Turkey with Bourbon Gravy
Ingredients
- 1 15-pound whole turkey (fresh or thawed) giblets and neck removed
For the brine:
- 1 quart apple cider
- ½ cup maple syrup
- ½ cup kosher salt
- 1 ½ tsp black peppercorns
- 2 sprigs fresh rosemary
- 1 cinnamon stick
- 1 orange zest only
- ¾ cup bourbon
- 1 gallon water
For the turkey:
- 1 apple quartered
- 1 onion (yellow or white) quartered
- 1 sprig fresh rosemary
- 3 cloves garlic smashed (no need to peel)
- 1 cinnamon stick
- ½ cup unsalted butter at room temperature
- 3 tbsp brown sugar (light or dark)
- 1 tsp salt
- 2 tsp fresh rosemary chopped
For the gravy:
- ⅓ cup all-purpose flour
- 16 oz chicken broth
- 2 tsp fresh rosemary chopped
- 2 tbsp bourbon
- salt and pepper to taste
Instructions
Brine the Turkey
- In a large saucepan, mix the apple cider, maple syrup, kosher salt, peppercorns, rosemary, cinnamon stick, and orange zest. Bring the mixture to a boil, then turn the heat down to medium and allow it to simmer for 5 minutes.
- Remove the pan from the heat, set aside, and allow the mixture to cool completely.
- Remove the giblets and neck from the turkey if they were included.
- Place a brining bag into a large pan that’s big enough to hold the turkey. It will catch any drips and make it easier to move the turkey in and out of the refrigerator. Add the cider mixture to a large brining bag along with the bourbon and water. Place the turkey into the bag and allow it to brine for 8 to 24 hours, turning the turkey every few hours.
Roast the Turkey
- Grease/oil the rack of a large roasting pan.
- Remove the turkey from the brine, allowing any excess brine to drain from the cavity. Place it onto the prepared rack and use paper towels to pat it dry thoroughly.
- Add the apple, onion, sprig of rosemary, garlic cloves, and cinnamon stick to the turkey cavity.
- In a small mixing bowl, mix the softened butter with the brown sugar, salt, and rosemary and mix well to combine. Use your fingers to gently loosen the turkey skin at the neck and drumsticks. Rub some of the butter mixture under the skin and the rest of the mixture on the outside of the skin.
- Truss the turkey. Turn the turkey upside down and use a wooden skewer to close the neck flap if desired. Turn the turkey breast side up. Tuck the wings underneath the bird to keep the tips from burning. Tie the legs together using kitchen string or the attached plastic hock lock if your turkey has one.
- Roast the turkey at 500℉ for 30 minutes. Reduce the heat to 350℉ and roast for an additional 2 hours or until a meat thermometer inserted in the inner thigh reaches 165℉ (the thermometer probe should not touch the bone for an accurate reading). Be sure to check the turkey periodically as it cooks. If the skin is getting too brown, loosely tent the turkey with aluminum foil.
- When the turkey is done, remove it from the oven, cover with foil, and allow it to rest for 10-20 minutes.
Make the Gravy
- Drain the drippings out of the roasting pan, add them to a medium saucepan, and bring them to a simmer.
- Meanwhile, add the flour and chicken broth to a sealed container (like a mason jar) and shake for about 1 minute or until the flour dissolves into the broth.
- Add the flour mixture to the pan with the simmering drippings, then add the rosemary and bourbon. Stir constantly for about 15 minutes until the mixture thickens.
- Season with salt and pepper, if desired.