
I love all things leopard, and I have been wanting to make this Leopard Milk Bread recipe ever since I found it. Now, I’m not a seasoned bread maker, and truth be told I have only tried two bread recipes: Dutch oven bread and baguettes. I have gotten the Dutch oven bread down, but my understanding is it’s among the easiest types of bread to make.
I have seen tons of pins for other types of bread that I want to make too, and Japanese milk bread is one of those. It got bumped to the top of my list when I found this recipe. Leopard bread is a thing??!! Shut up and take me to the kitchen!
Leopard Milk Bread Recipe made with bread flour, cocoa powder, and orange zest. Soft homemade bread recipe with fun leopard spots!
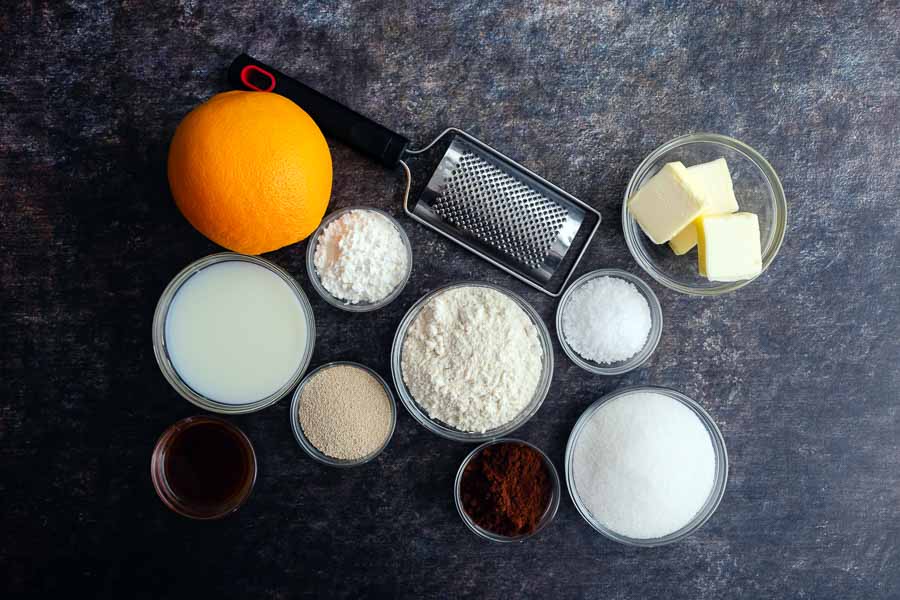
The Ingredients
For something I imagined would be a complex recipe, there aren’t a lot of ingredients—10 in all. My pre-shopping check showed me I had several of them already: cornstarch, active dry yeast, granulated sugar, unsalted butter, vanilla extract, and kosher salt.
I also had cocoa powder but it was running really low. On an unrelated shopping trip to Fresh Market, I happened to find a box of high-quality Dutch process cocoa powder, so I didn’t have to order it like I did last time. I considered the generic stuff I normally buy, but I went with the good stuff since this is a special recipe.
When it was time to shop for my Leopard Milk bread a few weeks later I was able to find everything else at my regular grocery store. All I needed was bread flour, whole milk, and an orange for zest.
The Process
Most of the recipes I blog go according to the recipe the first time I try them. I don’t have many fails, mostly little hiccups I’m able to solve as I cook. That didn’t happen on my first attempt at Leopard Milk Bread. In fact, it was a complete failure.
As mad as I was, I wasn’t about to give up, though. I sent Mr. Pinner to pick up a couple of oranges and immediately tried this recipe a second time. That was a very long and very painful day thanks to my bad back, but I learned a lot and I’m going to share what not to do when making this recipe.
Making the Dough
How Much Sugar?
A question popped up just as I began measuring my ingredients. I measured my ingredients by volume on my first try and used 2/3 cup of sugar. I decided to weigh them on my second try, and the recipe lists 70 grams of sugar.
The problem I had happened when I scooped 1/3 cup of sugar onto my kitchen scale. It weighed 93 grams. That means 2/3 cup would weigh 186 grams, more than double the 70 grams listed.
I took a quick break to search for a few other Japanese milk bread recipes to compare the amount of sugar they used with this recipe. They listed much less than 2/3 cup, so I decided on using 70 grams of sugar.
FYI, the other weighed ingredients were close to the volumes listed. The sugar was the only one that was off.
Proofing the Yeast (Steps 1-2)
This recipe breaks the steps to make this bread into easy-to-understand steps. The first time I tried it, I think my mistakes began with proofing the yeast. On my first attempt at Leopard Milk Bread, I had to make the milk mixture twice.
For the first milk mixture, I warmed the milk in the microwave at 70% power for 30 seconds. I used my meat thermometer to make sure it wasn’t too hot, but I added all the sugar after mixing in the cornstarch.
No worries, I was just starting out and had enough ingredients to redo the milk mixture. This time I forgot to lower the microwave’s power and used it on high. I also didn’t check the temperature, and I’m sure it was too hot. Why? Because the yeast didn’t foam very much after sitting for 10 minutes.
By the time I re-made the bread, I had also re-read the blog post and noticed the milk should have been at 110℉. That’s not in the recipe or the notes. But it made a huge difference, and that time the yeast looked as foamy as a freshly poured beer.
Mixing the Dough in the Stand Mixer (Steps 3-9)
As I mentioned, I regularly make Dutch oven bread, and the dough for that is very shaggy. My first Leopard Milk Bread dough looked like Dutch oven bread dough. I didn’t think too much of it, but that’s not what was needed.
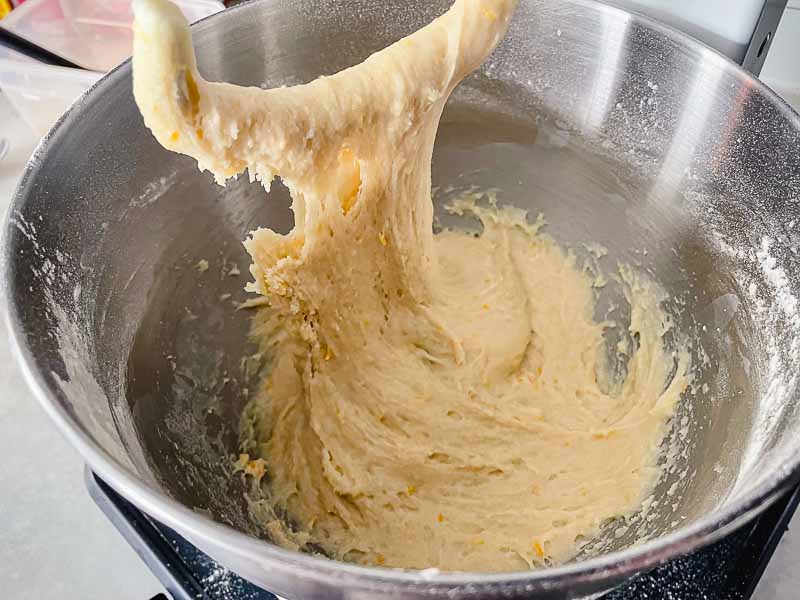
The dough for my second attempt was very different. This time it came together and was far less sticky. It didn’t even stick to the stand mixer bowl. That helped so much when I had to roll it up later on. The first version of the dough required lots of extra flour on the work surface and my rolling pin. The second version didn’t need any at all.
I didn’t have any trouble following along until I got to step 9, the window pane test. Not being an experienced bread maker, I had no clue what a window pane test was. I had to google it, and the first result had a text and video explanation. It also showed how to properly knead the dough, which was helpful later on in the process.
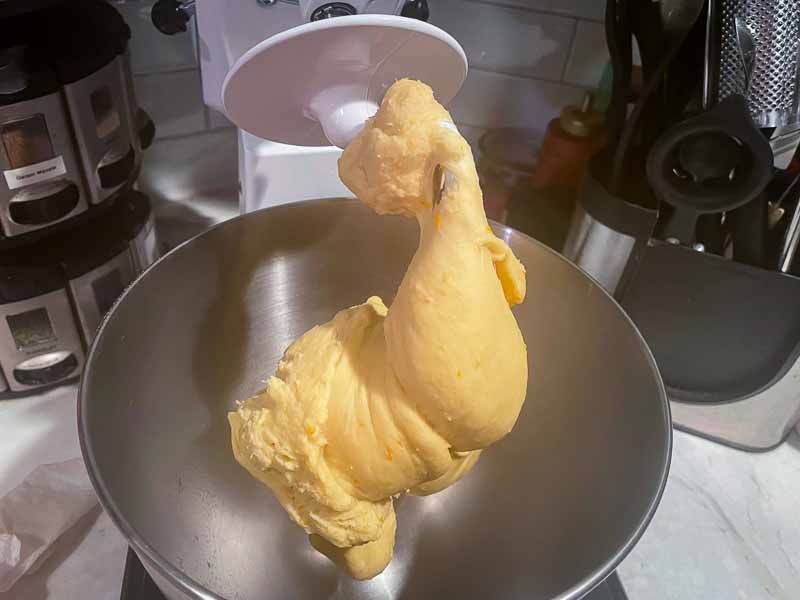
Finishing up the Dough (Steps 10-22)
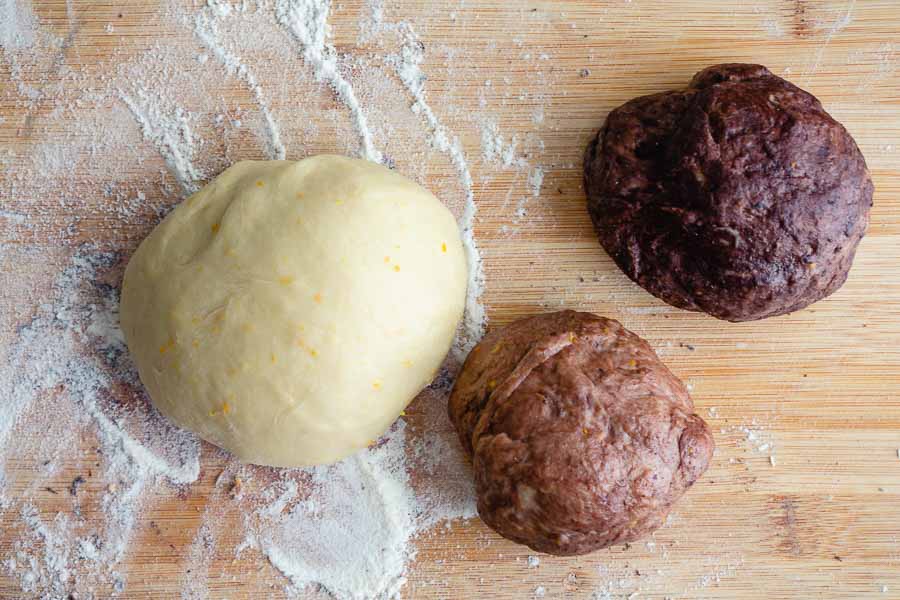
The rest of this section involves dividing the dough and coloring it with chocolate paste. This is where the article I just mentioned came in handy. Making the paste was very simple, but kneading it into the dough took some time and effort. I’d say 3-5 minutes of kneading for each. And kneading was more work than I thought it would be, but I ended up with the 3 colors of dough then wrapped them and refrigerated for an hour.
Making the Loaf
Dividing the Dough (Steps 1-4)
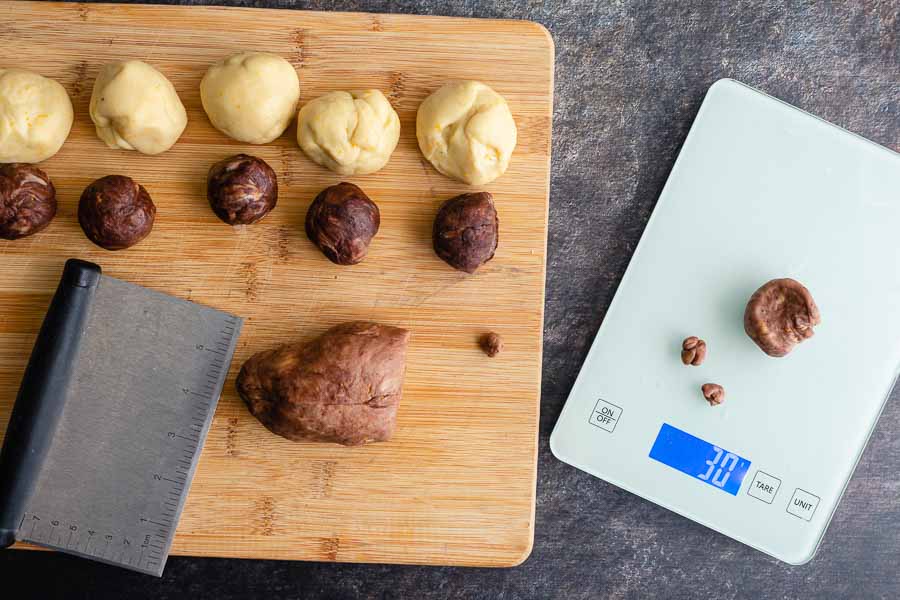
Once the Leopard Milk Bread dough was ready, I had to use my kitchen scale to divide each color into 7 equal pieces. Tip: Using the grams setting makes this step much easier than pounds and ounces. I did that by adding pieces of dough to the scale until I got the weight I needed. Then I rolled them into a ball and moved on to the next one.
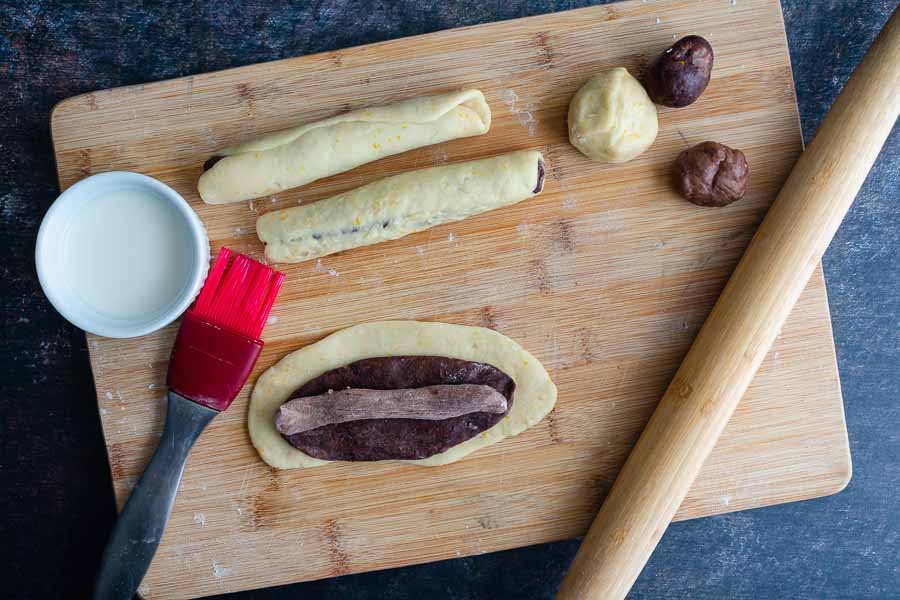
Rolling the Dough (Steps 5-18)
Once I had all 21 pieces, I was ready to roll them into mini “cigars”. The recipe breaks down how to do that in detail. My mistake on the first attempt was trying to get them to be as long as the loaf pan (8 inches). The dough didn’t cooperate, and that wasn’t necessary.
The secret here is to roll the dark brown dough into a cylinder and let that length be your guide for the other colors. It will be rather short, but you will roll out the completed cylinders to longer pieces later. Those still won’t be as long as the pan, but they will get longer when they rise.
Baking the Loaf
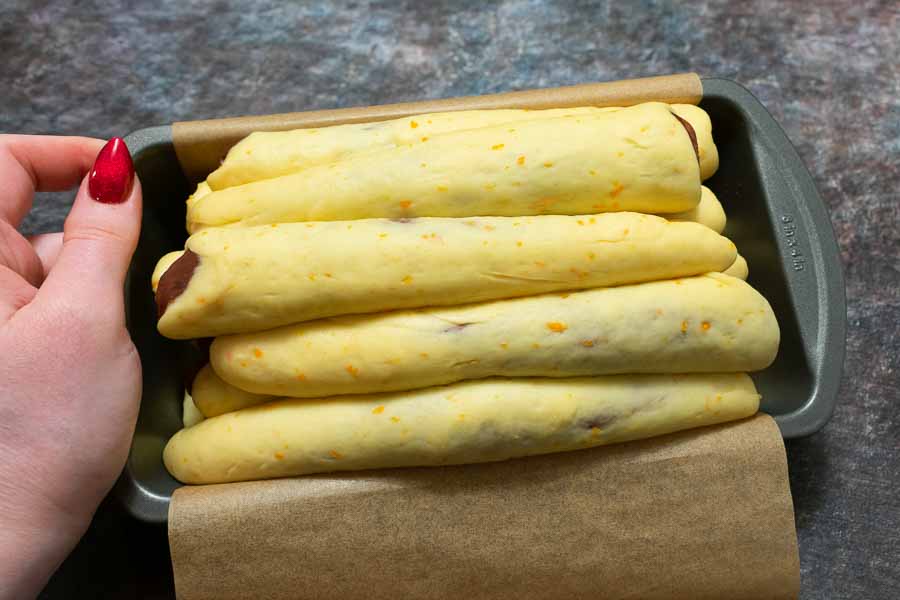
This section includes preparing the pan, adding the dough to it, letting it rise, baking, and cooling. It sounds like a lot, but it wasn’t bad because of the inactive time rising, baking, and cooling.
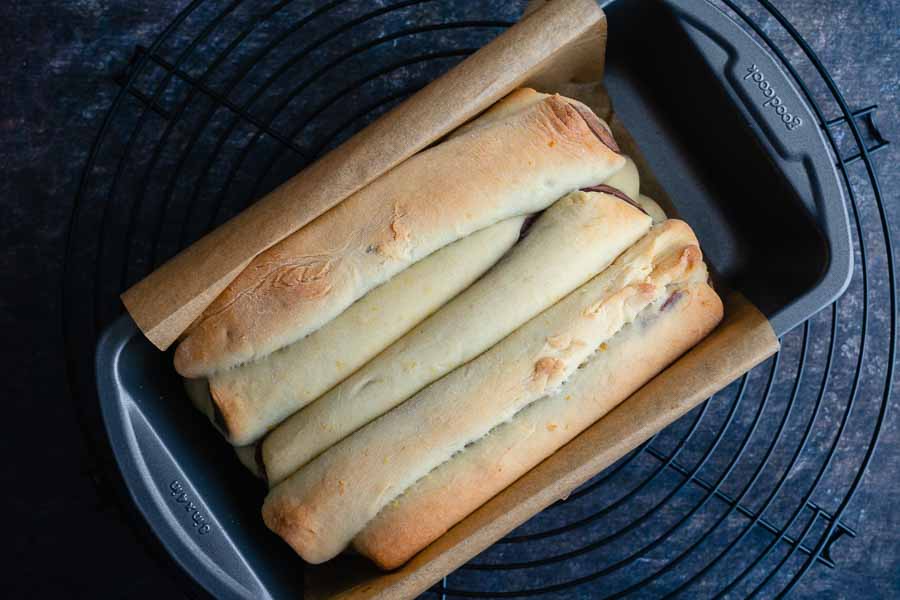
Once the pan was lined with parchment paper, all I had to do was stack the dough cylinders inside. They came up to the top of the pan before rising.
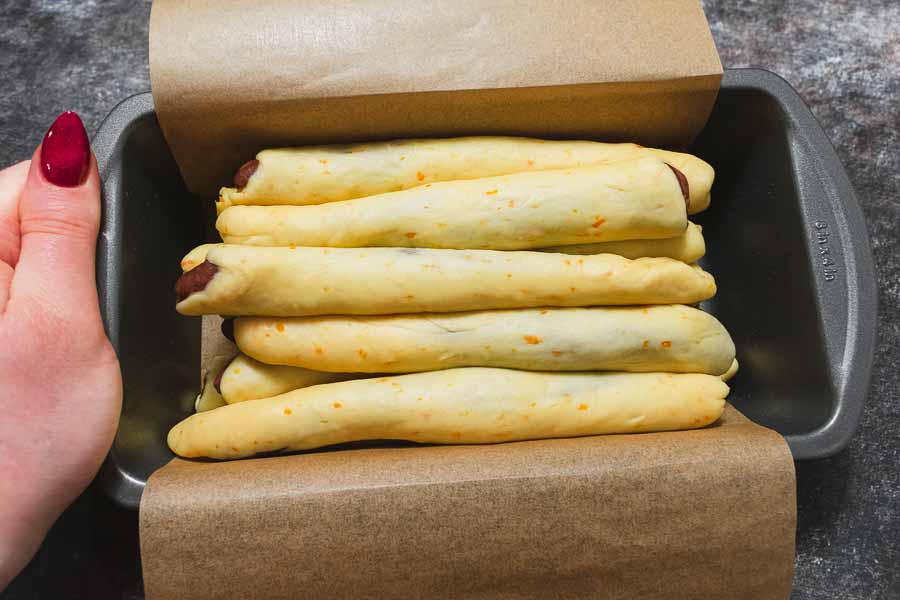
I keep my home air-conditioned, so I heated a mug of water in my microwave to create a warm environment. Then I moved the mug aside and let the covered dough rise in the microwave for an hour.
The dough rose an inch or two beyond the top of the pan on my 2nd try (it didn’t rise at all on my 1st try). In fact, the first batch of dough was very heavy when I lifted the pan. The second batch was much lighter after rising.
From there it was into the oven. I added my meat thermometer and let the bread bake. There was a gap at the side of the pan, so it was pretty easy to slip the probe into the bread without messing it up.
It took exactly 45 minutes to reach 190℉ in the center of the loaf. I have to confess I forgot to turn the heat down to 350℉ right away, which is probably why the outside is so dark. I didn’t notice it until about 30 minutes into baking, then I turned the heat down and placed a sheet on top of the bread to keep it from burning on top.
Timing
So this Leopard Mik Bread recipe is a long one. It lists 15 minutes to prep, 2 hours to rise, and 40 minutes to cook. The total time is listed at 55 minutes, but that doesn’t include rising time. The recipe also mentions cooling for 15 minutes, and I don’t think that’s included. The total time including rising and cooling time would be 3 hours and 10 minutes.
I took a bit longer and broke my time down as follows:
- 1 hour and 2 minutes to prep the dough
- 1 hour to chill the dough
- 36 minutes to make the loaf
- 1 hour to rise
- 45 minutes to bake
- 15 minutes to cool
- 4 hours and 38 minutes total
It looks like the slowdown was in prepping the dough and assembling the loaf. I took 1 hour 38 minutes but the time listed was 15 minutes. I’m not an experienced baker, but the time listed seems too short for something so involved.