
Have you ever heard of Baked Alaska? I have, sort of. I know it’s an old-fashioned desert, but that’s about it. Well, I was going through my food calendar, and I noticed February 1st is National Baked Alaska Day. That prompted me to find out what exactly baked Alaska is because why not? Turns out it’s a round/circular layer of sponge cake topped with a dome of ice cream. The ice cream is then topped with a layer of browned meringue.
I chose these Mini Baked Alaskas because the full-size recipes I found serve 8-16 people. It’s just the two of us, and we would never finish that in one go, and this isn’t a storable kind of dish. The ice cream would melt in the refrigerator, and the meringue would be ruined by freezing. It’s a one-shot kind of thing, so individual servings were just what I needed!
These individual baked Alaskas are the perfect dessert for two!
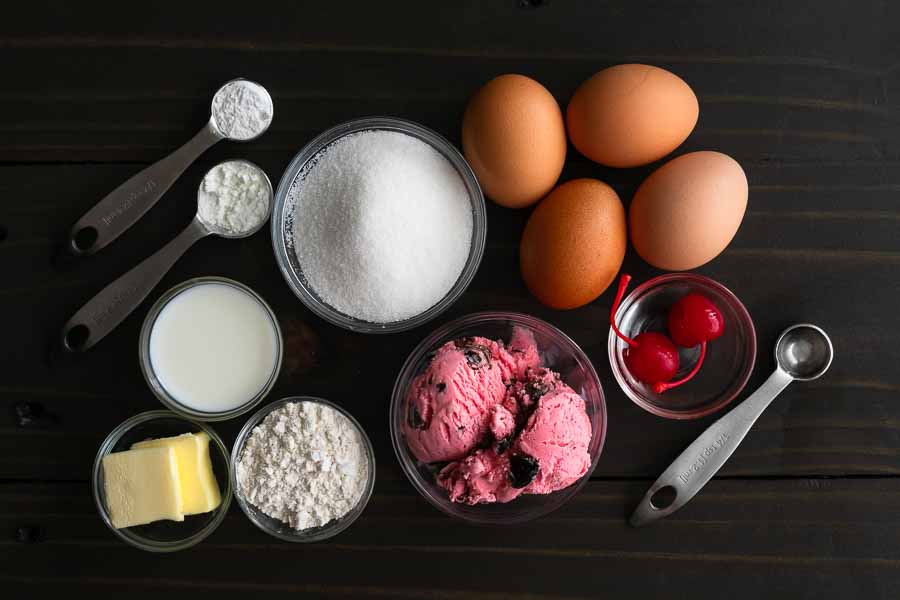
The Ingredients
The author used black cherry sorbet in her Mini Baked Alaskas, but I couldn’t find it. I went to three grocery stores that day, and none of them had sorbet or gelato with cherries. The closest I found was Chocolate Cherrish Passion ice cream from Publix. Per the packaging, it’s “cherry-flavored ice cream with chocolate fudge ribbons, sliced black cherries, and liquid cherry-filled candy hearts.” Yum!
I had some of the other ingredients on hand like baking powder, cornstarch, and granulated sugar. I also had some Maraschino cherries soaked in bourbon, so I used those instead of Morello cherries. That left me shopping for eggs, milk, unsalted butter, and almond extract in addition to the ice cream.
The Process
This recipe for Mini Baked Alaskas consists of a layer of sponge cake, a layer of ice cream with a cherry center, and a layer of meringue that’s torched until browned. This recipe walked me through the whole process.
Making the Sponge Cake
Most of the work is making the almond-flavored sponge cake. This part wasn’t very different from most cakes. My only question was whether I had the right type of loaf pan. The recipe calls for a 9″ x 5″ bread loaf pan with sharp corners, so a Pullman loaf pan was what popped into my head. It’s a box with very sharp corners that have no rounding at all. And I don’t have one. My plain old 9' x 5' loaf pan does have slightly rounded corners, so I decided to use it and not buy yet another piece of equipment.
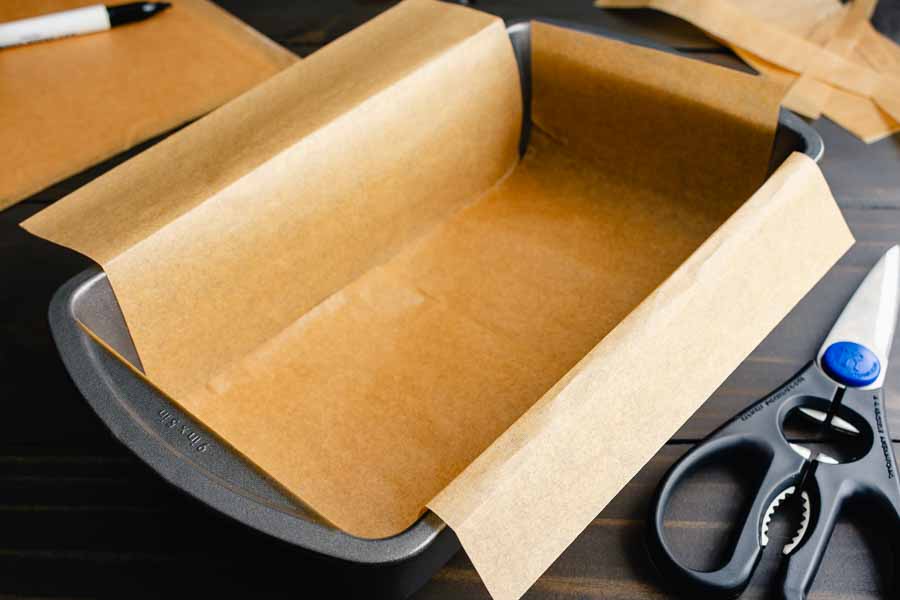
I used my loaf pan to trace two pieces of parchment paper to fit perfectly and skipped greasing it per the recipe. That part made me nervous, but I decided to trust the recipe and started on the cake. I have to say this recipe was great! Each step was laid out and easy to follow.
Tip: Switch steps 4 and 5 if you have a stand mixer to save some time. That way you can sift the flour and other dry ingredients while the mixer handles the egg and sugar.
Other than switching steps 4 and 5 to save myself a few minutes, I filled the recipe to the letter. Waiting for the cake to cool was the hardest part but worth it. I got a thin piece of cake with no tears or issues removing the parchment paper.
Assembling My Mini Baked Alaskas
First, I had to cut out the small round pieces of cake. My first idea was to trace the scoop with a paring knife, then I realized I had the perfect tool for this job: biscuit cutters. I have a set with several sizes, so I chose the one closest to the ice cream scoop’s diameter. It made this part very easy and precise. In fact, I was able to cut out four pieces of cake instead of just two.
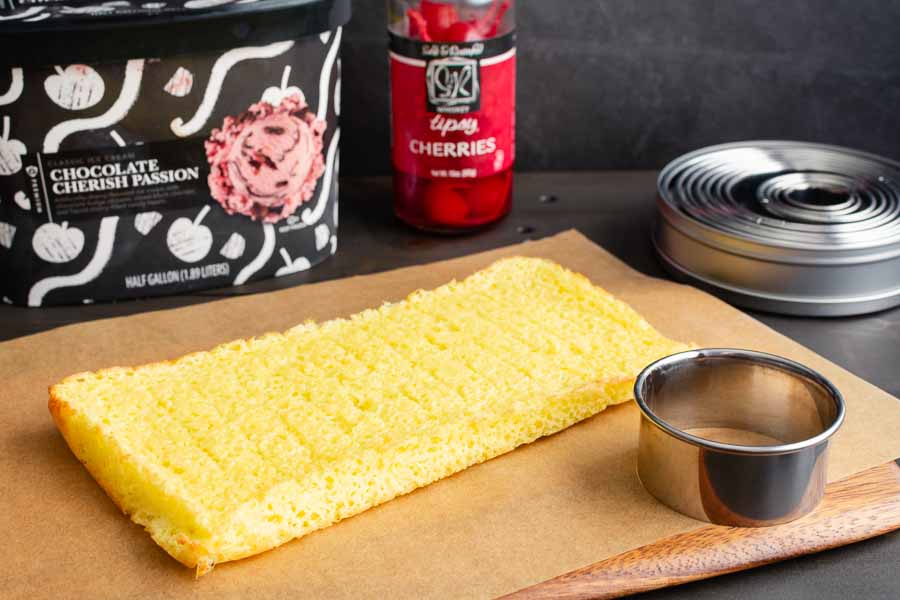
The ice cream was next. I have a spade-style ice cream scoop, so I had to order a round ice cream scoop. The ice cream needs to be a half sphere, and my scoop just wouldn’t do that. My new ice cream scoop made perfect little domes.
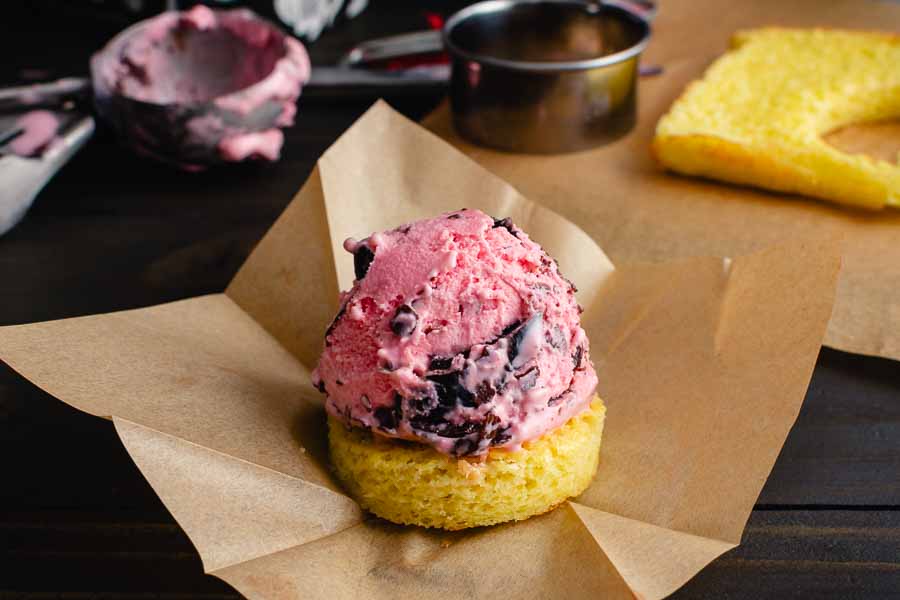
With the ice cream still in the scoop, I used a small measuring spoon to scoop out enough to stuff in a cherry then replaced the ice cream over it. Then I added the round piece of cake, turned the scoop upside down, placed the cake on a tulip-style cupcake wrapper, and released the ice cream. Next, I dropped the cupcake wrapper into a ramekin and put my almost-Baked Alaskas into the freezer for 1 hour.
Tip: Tulip-style cupcake liners are just folded squares of parchment paper. That makes them easy to fold and drop into a ramekin for freezing. It also makes them easy to lift out and unfold when you are ready to plate and add the meringue.
Adding the Meringue
I was almost there! My next step was to add the egg whites and sugar to my stand mixer and use the whisk attachment to make the meringue. Well, technically not meringue since the recipe says not to beat the eggs to stiff peaks. It’s really eggs and sugar whisked until fluffy, but “meringue” is shorter.
At any rate, I was a bit worried about this step because it was very different from anything I had ever done before. Again, I trusted the recipe and it walked me through it with no problems. I smoothed on as much of the meringue as I could get onto the ice cream and ran a fork through it to create the swirls and whorls.
Now it was the final step, and the one I was looking forward to. It was time to torch the meringue. I love any excuse to use a kitchen torch, so I started waving it over the newly made but un-Baked Alaskas until they browned to my satisfaction. I love how they turned out!
By the way, the original way to brown the meringue was by waving a red hot metal salamander over the finished dessert. It’s not the kind of salamander you’re thinking of! It’s more like a small, round metal plate on a long arm. It was set into the fire to heat then waved over the dessert until it browned. A modern way to do this is under your oven’s broiler or by torching it.
The History of Baked Alaska
If you would like to learn more about this storied desert, I highly recommend taking a peep at a couple of articles. Britannica has a short entry that mentions three possible inventors.
Check out Meet Baked Alaska’s Prototype, ‘Alaska, Florida’ by Diana Hubbell over at Atlas Obscura if you want a deeper dive into what seems to be the most popular origin story. Additionally, it has a recipe adapted from what may be the OG Baked Alaska. The recipe is adapted from The Epicurean by Charles Ranhofer of Delmonicos’ Restaurant in New York City. Yes, THE Delmonico’s that opened in 1837 and is still serving Chef Ranhofer’s Alaska, Florida to this day, though they call it Delmonico’s Original Baked Alaska.
Timing
This recipe lists 2 hours to prep, 15 minutes to cook, and a total time of 2 hours and 15 minutes. I broke down the prep time as I completed various milestones. Here’s how my time was spent:
- 14 minutes to prep the cake
- 10 minutes to bake the cake
- 10 minutes to cool in the pan
- 10 minutes to cool in a wire rack
- 4 minutes to scoop and fill ice cream
- 1 hour to freeze ice cream
- 6 minutes to make meringue
- 7 minutes to apply and torch meringue
- 2 hours 1 minute total
That’s right in line with the recipe’s total time. I’m a little surprised because I fussed over this and took my time. That was especially true when I made, applied, and torched the meringue. I was sure my Mini Baked Alaskas would have gone way over the time listed.