
A while back I was looking over my calendar and noticed today was National Strawberry Cream Pie Day. I’ve had strawberry pie, but I have never had a Strawberry Cream Pie. That sent me to Pinterest to search for a recipe. It turns out there are many versions of strawberry cream pie. I read through a few, got hungry while I read, and settled on this version. It sounds a lot like a strawberry cheesecake, and I have a lot of fond memories of that from my childhood. But is it the same thing? there’s only one way to find out, and that means I need to do some baking!
There’s no shortage of fresh berry flavor packed into this scrumptious Strawberry Cream Pie! A flaky butter pie crust is paired with a light and creamy filling, chopped strawberries, a sweet strawberry glaze and fluffy homemade whipped cream.
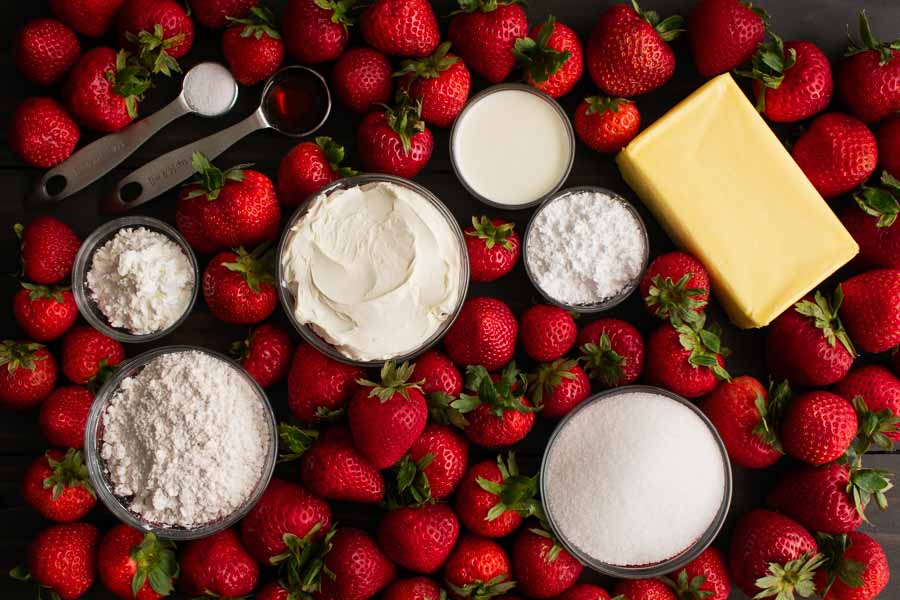
The Ingredients
This Strawberry Cream Pie recipe includes a link to a homemade pie crust recipe. That meant I had to show for the pie and pie crust ingredients. A quick kitchen perusal as I made my shopping list revealed that I had a few ingredients on hand. They were all easy-to-store pantry basics like all-purpose flour, powdered, sugar, cornstarch, salt, and vanilla extract.
That left me to shop for heavy whipping cream, unsalted butter, cream cheese, granulated sugar, and fresh strawberries. All of the ingredients I needed were easily found at my usual grocery store. They even had a special on strawberries! It was 3 16-ounce (1-pound) packages for $10. I estimated I needed 3 packages for this recipe and bought a 4th for the decorations and as a just-in-case kind of thing.
The Process
I split making the pie crust and filling over a few days. Some of it was optional, but I love being able to make things ahead when I can. Could it be made in a single day? Probably, but I hope you’re an early riser!
I also had some difficulties with this one, so it was an unusual pie-making experience for me. I’m including the whole saga and all the times at the end. This one was a doozy, but I loved the end result!
Making the Strawberry Puree
When I read over the recipe, I didn’t see a pause that would give me enough time to make the strawberry puree. I decided to make it the day before baking, along with the pie crust dough.
The concept is simple: puree the berries in a blender then strain out the seeds. I put 2 cups of strawberries into my blender, almost an entire 1-pound container. Once they were pureed, I strained them through my large mesh strainer. The mixture dripped through very slowly, so I used a large spoon to stir it and speed things up.
Unfortunately, lots of strawberry seeds made it through the mesh, so I had to re-strain it with my fine mesh strainer. That one is designed for cocktail making, so I had to do it in several batches.
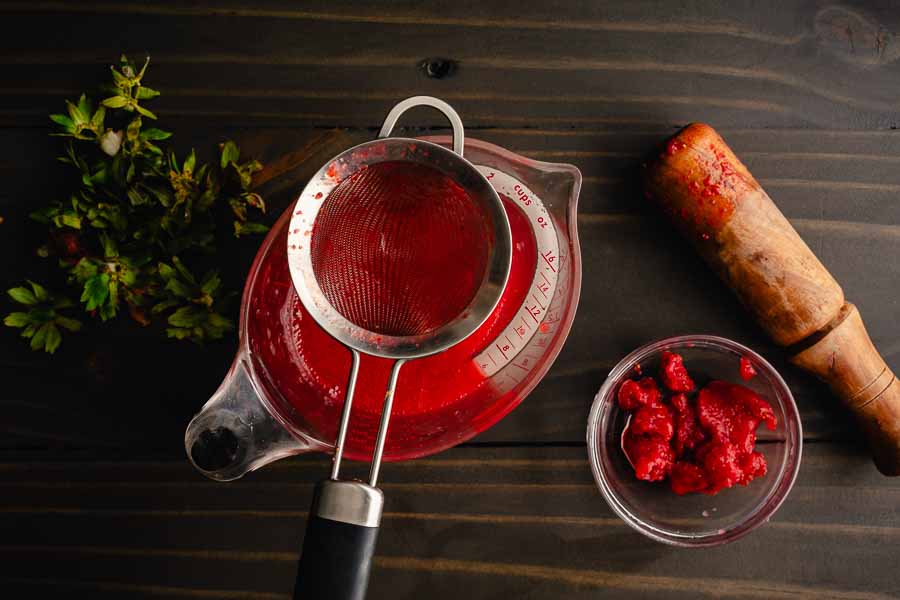
This time I switched the spoon for a wooden pestle (as in mortar and pestle), and it worked a treat! I used a gentle twisting-pushing motion to push the liquid through. I knew it was done when the seeds turned into a thick paste. Then I dumped them out and did more batches until I was done.
Imagine my dismay when all that work turned into only 3/4 cup of strawberry puree! I added the remaining strawberries from the container plus a few more from another. Five minutes later, I had the remaining 1/4 cup of puree. I put it into a sealed container and refrigerated it until I was ready to make my strawberry cream pie.
In the end, I’d say I ended up using 3 cups instead of the 2 noted in the recipe, but that wasn’t very unexpected. Strawberries vary in size, and their shape makes them hard to measure when they are whole. I completely missed the weight noted in parentheses and probably should have used that instead.
Making the Pie Crust (Take 1)
This Strawberry Cream Pie didn’t include the crust, but it did link to a separate Flaky All-Butter Pie Crust recipe by the same author. I decided to use that since I have a good. amount of experience making homemade pie crusts.
Since I have made pie crusts before I expected this part to go fine. It didn’t. Well, making the dough went fine, but baking the crust turned out to be a disaster.

Everything went according to the instructions, although the dough was a bit dry. I had to add an extra tablespoon of ice water to it before it would hold together. Then I divided it into 2 discs, wrapped them in plastic, and refrigerated them overnight. This recipe makes enough dough for a double-crust pie, so I planned to freeze the extra.
The next day, I began rolling out 1 of those discs. The recipe says to place the dough between 2 pieces of parchment, and I thought that was a great idea. It would be less messy and easier to get the rolled-out dough into the pie pan.
Rolling out cold dough was a test of strength and endurance. The recipe doesn’t say how large the dough needs to be, but it does specify the pan’s dimensions. Based on that, a 9-inch deep dish pie pan needed the dough to be 12 inches around to account for the sides and edge.
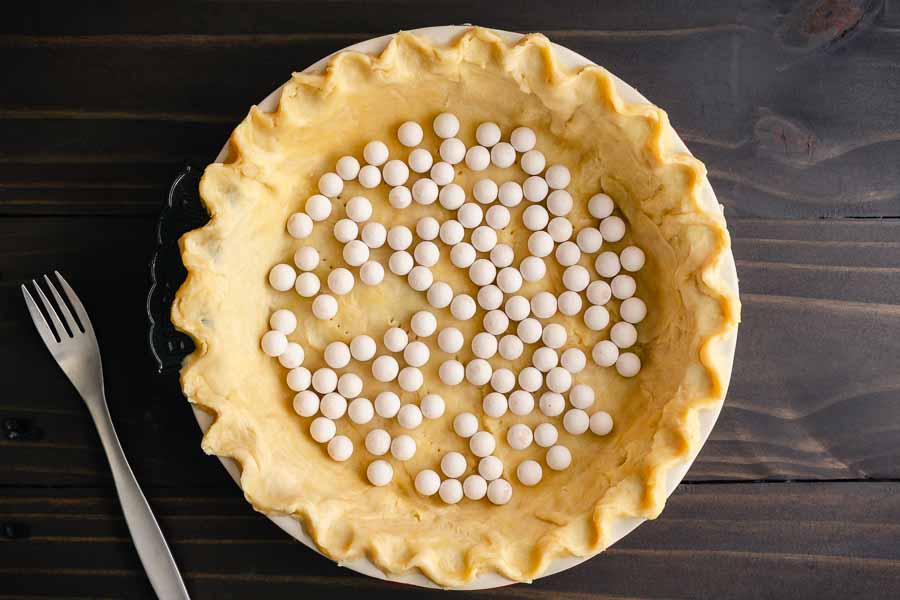
I finally managed to get the dough rolled out, and it took a lot of effort. First, I removed the parchment layer on the top. Then I put my hand underneath the bottom layer and flipped it onto the pie pan. I managed to get the edges crimped nicely, poked some holes in the bottom with a fork, added the pie weights, and put it into the oven.
Twenty minutes later I pulled out a shrunken mess. I’m guessing it’s because I sprayed the pan with canola oil, and that allowed the dough to slip into the bottom. The recipe didn’t say to spray or grease the pan, that was my own doing.
Making the Pie Crust (Take 2)
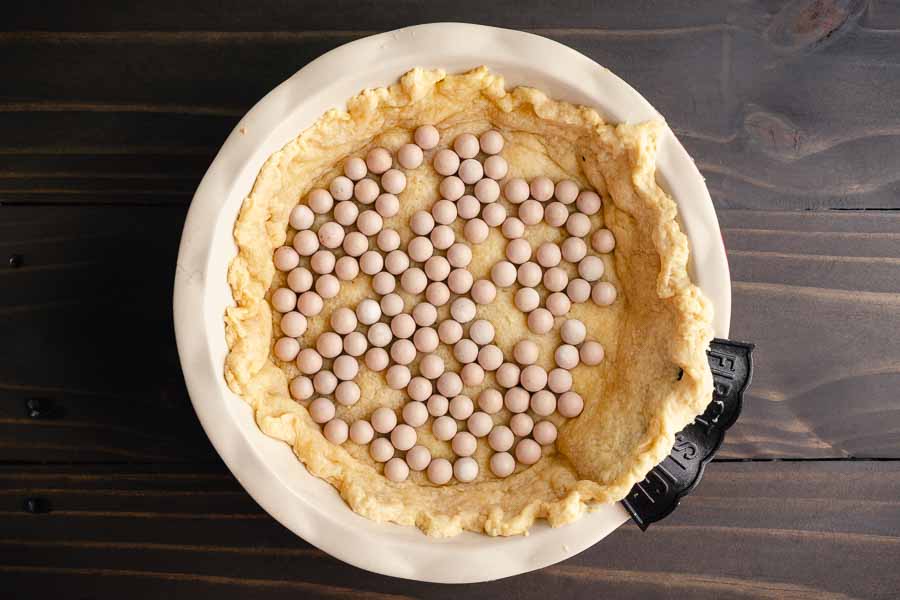
I still had the second disc of dough, so I had another chance. I did have to wait for the pie pan and weights to cool completely—I gave it an hour. Then I washed the pan to remove the canola oil and redid the crust.
The second piece of dough had come to room temperature, so it was much easier to roll out. I didn’t time it, but I had this crust ready in less than 10 minutes. I put it in the oven for 20 minutes and sat and waited very anxiously to see if this time would be a success. And…
No joy. It did the same thing as the first batch and the sides sank into the middle. I’m guessing it’s because the dough wasn’t cold and was instead at room temperature. I was out of butter and patience at this point, so I had hubby pick up a ready-made frozen crust.
I was in the middle of beating the whipped cream for the filling when the first pie crust came out of the oven (Step 3). It was good that I hadn’t mixed it into the cream cheese. I wrapped up the bowl of cream cheese and refrigerated it until the next day. Darn it, I had to toss out the whipped cream, but I had enough to make more so it was okay.
I finally figured out why the pie crust failed!
Update 11/22/23: I was reading another pie recipe and noticed it called for the pie pan, crust and all, to be popped into the freezer before baking. I did some more research, and Martha Stewart, Sally's Baking Addiction, and King Arthur Flour all agree the rolled-out crust needs to be chilled 15-30 minutes before it is baked to prevent it from slumping into the pan like mine did. They all have excellent tutorials with plenty of photos, too!
Making the Filling & Glaze
Since I stopped in the middle of making the filling, I had to let the cream cheese and sugar mixture come to room temperature. While I waited, I let the pie crust thaw and pre-heated the oven. Both took 20 minutes. Then I pricked the crust with a fork and blind-baked it according to the package instructions (for 11 minutes). Tip: Don’t skip the pie weights! I left them out because they weren’t mentioned in the directions on the package and the crust bubbled a little.
Once the crust had cooled, I whipped the cream cheese mixture in my stand mixer to freshen it up. I also mixed up more whipping cream to get me to the point where I left off the previous day. Things went very smoothly this time. I folded the cream cheese mixture with the whipped cream, filled the cooled pie crust, and refrigerated it while I made the strawberry glaze.
The glaze went quickly since I had made the strawberry puree the day before. I stirred it together with some sugar and cornstarch in a saucepan until it thickened. Then I poured it out of the hot pan into a shallow dish so it could cool on a wire rack. Tip: The wire rack wasn’t required, but it allowed air to circulate underneath the container so the glaze cooled faster.
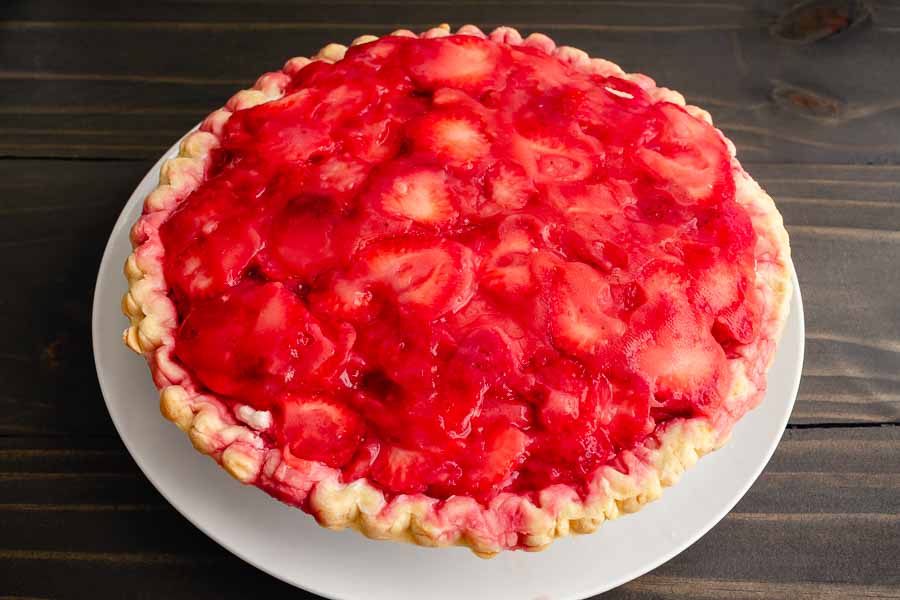
That gave me plenty of time to stem and slice the strawberries. The instructions say to use 3 cups or 380 grams of strawberries. I used 3 cups, but I also weighed them and they weighed 514 grams. But more is better, right?
I’m not completely sure. I couldn’t fit all of the strawberry glaze into the pie. I only had a few bites left, but I really packed it on! The pie had to chill for 4-6 hours, so I wrapped it well and refrigerated it overnight since it was late in the day.
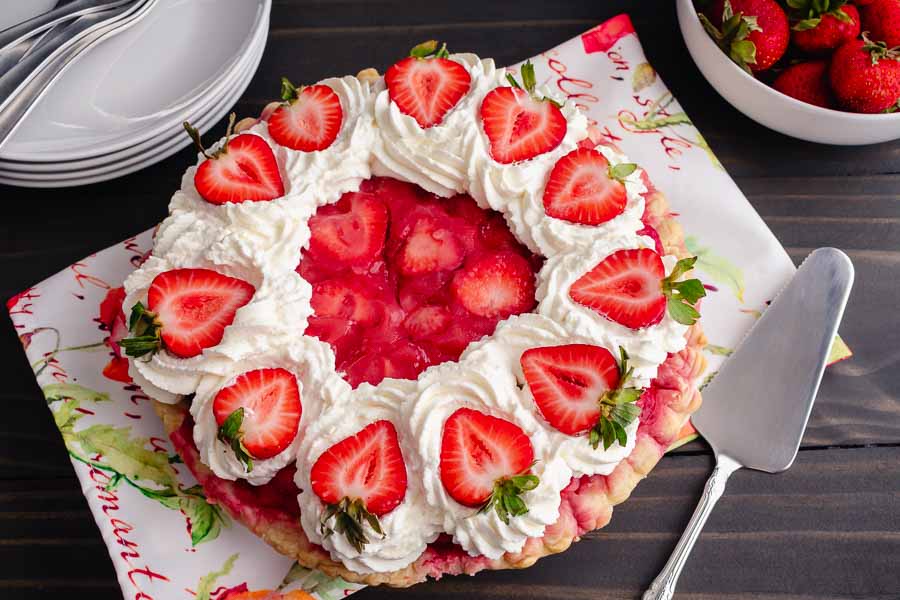
Decorating My Strawberry Cream Pie
In order to finish up my Strawberry Cream Pie I needed to make the whipped cream, pipe it onto the pie, and add a few halved strawberries. This part wasn’t too difficult, and I had it done in about 10 minutes.
I had to be strategic about placement because overfilling the crust with strawberry glaze caused the crust to absorb some of the pink liquid. I’m not the greatest decorator, and while I intended to hide the stained crust I didn’t quite do that. My nerves always take over when I have to decorate baked goods, but I don’t think I did too badly, though!
Timing
As I mentioned, I used 2 recipes for this one: Flaky All-Butter Pie Crust plus Strawberry Cream Pie. Although the crust was a total failure, I did complete all the steps for making it. The Strawberry Cream Pie recipe also mentions blind baking the homemade crust in Step 1, so it’s hard to separate the two recipes.
I am going to use the times for the pie with a homemade crust in my final rating, but I will also list the times for the pie with the frozen crust. I’m going to list the times for the pie crust alone, the pie with homemade crust, and the pie with frozen crust.
Flaky All-Butter Pie Crust
The pie crust listed 15 minutes to prep, 1 hour to chill, and 1 hour 15 minutes total. Here’s how my time was spent on it:
- 16 minutes to prep the pie crust
- 14 minutes to roll out the dough
- 9 minutes to place in pan and pinch edges
- 20 minutes to bake
- 39 minutes total (not including time to chill)
I refrigerated my pie crust overnight, and the recipe doesn’t include time to roll out the dough and add it to the pan (that’s mentioned in the Strawberry Cream Pie recipe). Blind baking for 20-25 is optional, and the times were mentioned in the last step but not included in the total time either. The only time I can really compare is the prep time, and I came within 1 minute of that.
Strawberry Cream Pie with Homemade Pie Crust
The Strawberry Cream Pie recipe listed 45 minutes to prep, 40 minutes to cook, and 5 hours 30 minutes total (including time to chill). Step 1 of the Strawberry Cream Pie recipe mentions rolling out the pie crust dough and blind baking it, so I’m including those times in this list:
- 14 minutes to roll out the pie dough
- 9 minutes to place dough in pan and pinch edges
- 20 minutes to blind bake crust (time to cool unknown—I didn’t bother since it was a fail)
- 13 minutes to make cheesecake filling and fill pie crust
- 8 minutes to make strawberry glaze
- 25 minutes to cool the glaze
- 9 minutes to slice the strawberries for glaze (while glaze cooled)
- 3 minutes to mix the glaze with sliced strawberries and add to pie
- 4 hours minimum to chill (I chilled mine overnight)
- 10 minutes to make whipped cream and decorate pie
- 5 hours 42 minutes total (used for the time rating)
This method put me a little bit over the total time listed, but not much at all. I’m sure it was because I refrigerated the pie dough overnight. It was so cold that I had a lot of trouble rolling it out the next day.
Strawberry Cream Pie with Frozen Pie Crust
Again, the Strawberry Cream Pie recipe listed 45 minutes to prep, 40 minutes to cook, and 5 hours 30 minutes total (including time to chill). I chilled my pie overnight, so I’m using the minimum time for chilling listed in the recipe. I’m also including the times from the frozen pie crust instructions in this list (they were spot-on):
- 20 minutes to thaw the crust and preheat the oven
- 11 minutes to blind bake the crust (cooled during filling prep)
- 13 minutes to make cheesecake filling and fill pie crust
- 8 minutes to make strawberry glaze
- 25 minutes to cool the glaze
- 9 minutes to slice the strawberries for glaze (while glaze cooled)
- 3 minutes to mix the glaze with sliced strawberries and add to pie
- 4 hours minimum to chill (I chilled mine overnight)
- 10 minutes to make whipped cream and decorate pie
- I am going to use the times for the pie with a homemade crust in my final rating.
That’s exactly the total time listed on the pie recipe!
I like the efforts you have put in this, regards for all the great content.
Thank you so much! I really appreciate that 😊